40K using the Kill team turn sequence
Last weekend Alan and I played a 1500 point game of 40K. We used the turn sequence from Kill Team to try out a more interactive game rather than the completely separate normal 40K turn sequence.
I took my Executioners marines, using the Black Templar chapter tactics and Alan used his Doom Farers using the Imperial Fist tactic.
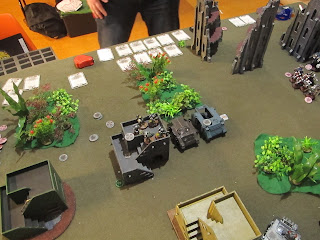 We were playing the Relic Scenario and the deployment was lengthwise, the Executioners are on the left and the Doom Farers are on the right. Alan moved first so pushed his Rhino over the objective.
 Here is my other Rhino, trying to sneak round the forest and set up a pincer movement.
 Here is the clump of Doom Farers there are some intercessors protecting the rear and some tactical marines in the ruin on the right.
 In Turn two the Doom Farers move first, two tactical squads jump out of the Rhino, one squad grabs the relic an legs it, the other fans out and prepares to hold off pursuit. The Executioners dismount from their Rhino and charge the rearguard. The Company champion is accompanying the crusader squad.
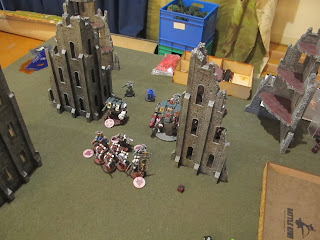
 This shows the back of the Doom Farers position, the Executioners Sternguard squad has droped in near the back of the table, the Intercessors were on alert and shot at the sternguard, who had left all their armour back on the ship. (I failed 4 armour saves so they might as well have been naked. The Sternguard then fired back using the Decisive Shot strategem and the combi plasma gunners fired back on maximal, they got 6 hits and 6 wounds without needing rerolls so the intercessor squad was wiped out in return. The rest of the Doom Farer shooting killed 3 more Sternguard. The Veteran sergeant passed his moral test at the end of the turn without even needing his reroll.
 My flanking force ran into trouble and the Rhino got blown up and then the entire squad got wiped out by the dreadnought.
This left the Emperors Champion, who now had the Hellblasters in charge range.
 The close combat between the rearguard and the Executioner crusader squad went well but not well enough. One guy was left alive and I couldn't move to wrap around the survivor.
In turn 3 I won the initiative and had to move first. Alan then fell back with his tactical marine. This meant my squad could shoot but could also be shot at.
The Emperors Champion made his charge into the Hell Blasters and my Assault Terminators beamed down and charged the Doom Farers captain who had counter charged the Emperors Champion.
 Here is a duel between my surviving tactical marine sergeant and Alan's badly damaged Rhino. My Sergeant missed and got killed in the return fire.
 My Captain, Lieutenant and veteran sergeant try and make the tactical squad go away. Neither officer wants to waste time killing them with their guns, they want to give them the honor of dying in close combat.
 Shoting is up close and personal, it is brutal with my squad getting wiped out but killing the enemy tactical squad in return. The Company Champion killed the last guy with a Krak grenade to the face.
 The last two members of my Crusader squad get shot down by Alans vehicles
 In the climax of the battle, in honourable close combat. The Emperors Champion goes first and engages the Doom Farer Captain. I inflict 5 out of his 6 wounds. He strikes back against the terminators and kills the guy with the Thunder hammer. I then kill him with the lightning claws. Then Alan activates "Only in Death does Duty End" his captain then kills 5 4 more terminators leaving only the sergeant. The Emperors Chaptain then activates again and kills off two more Hell Blasters.
 My Captain and Lieutenant have made it into combat with the tactical squad, between the two officers, I managed to kill one tactical Marine and took a wound in return.
My Emperors champion got squished by the Dreadnought so when I was forced to move first in turn 5 we called it. Alan would have fallen back and shot me to bits.
This turn sequence makes for a really engaging game, you are always doing something rather than taking half the time to just sit there and roll saves. The Black Templar tactic is good for long range charges but the White Scars ability to fall back from combat and charge other units looks like it will be great in mitigating the problems an assault army can face if it is forced to move first and the enemy can then just fall out of combat and shoot you.
I took my Executioners marines, using the Black Templar chapter tactics and Alan used his Doom Farers using the Imperial Fist tactic.
 We were playing the Relic Scenario and the deployment was lengthwise, the Executioners are on the left and the Doom Farers are on the right. Alan moved first so pushed his Rhino over the objective.
You can see Alan's clump of Hellblasters, supported by the captain, lieutenant and ancient. They open the shooting phase and 5 of my tactical marines died to the opening volley.


 This shows the back of the Doom Farers position, the Executioners Sternguard squad has droped in near the back of the table, the Intercessors were on alert and shot at the sternguard, who had left all their armour back on the ship. (I failed 4 armour saves so they might as well have been naked. The Sternguard then fired back using the Decisive Shot strategem and the combi plasma gunners fired back on maximal, they got 6 hits and 6 wounds without needing rerolls so the intercessor squad was wiped out in return. The rest of the Doom Farer shooting killed 3 more Sternguard. The Veteran sergeant passed his moral test at the end of the turn without even needing his reroll.
This left the Emperors Champion, who now had the Hellblasters in charge range.

In turn 3 I won the initiative and had to move first. Alan then fell back with his tactical marine. This meant my squad could shoot but could also be shot at.
The Emperors Champion made his charge into the Hell Blasters and my Assault Terminators beamed down and charged the Doom Farers captain who had counter charged the Emperors Champion.


My Emperors champion got squished by the Dreadnought so when I was forced to move first in turn 5 we called it. Alan would have fallen back and shot me to bits.
This turn sequence makes for a really engaging game, you are always doing something rather than taking half the time to just sit there and roll saves. The Black Templar tactic is good for long range charges but the White Scars ability to fall back from combat and charge other units looks like it will be great in mitigating the problems an assault army can face if it is forced to move first and the enemy can then just fall out of combat and shoot you.


Comments
Post a Comment